

Design exports
Export Ink screens as images for chat and tldraw.
Use ink export to render pages and standalone TSX components as PNG images. Each image is 1080 × 1240 pixels, the Light Phone III screen size. Exports run independently of the emulator.
Generate an app header
Save four LP3 screenshots as assets/a.png, assets/b.png, assets/c.png and assets/d.png, in display order. Each screenshot must be 1080 × 1240 pixels.
ink headerInk writes assets/header.png: a 2572 × 1048 image with the app’s generated icon, name and four screenshots. It uses bundled Public Sans and does not require the design renderer or Android build tools.
To choose different files or an output path:
ink header assets/home.png assets/show.png assets/player.png assets/settings.png \
  --out assets/header.png
Paths are relative to the app directory, including when using ink -C <app-directory> header.
Set up the renderer
Use an Ink project with its JavaScript dependencies installed. The renderer setup requires:
- macOS: Homebrew and uv. The script installs the remaining build dependencies through Homebrew.
- Linux: uv, a C/C++ compiler, LLVM development files, Ninja, Bison, Flex, glslang, SPIRV-Tools, pkg-config, and zlib and Expat development files.
From the Ink SDK checkout, build the CPU renderer:
./scripts/setup-design-rendererRun setup once. The first build takes a few minutes; subsequent exports use the cached renderer. An Android SDK, device, emulator or GPU is not required.
Export a page
From your app directory, export a route:
ink export /settingsOmitting the route exports /. Route exports include the app’s layouts and back navigation. They open the requested page without mounting the startup page first.
Set the frame name and output directory:
ink export /settings --name "Settings" --out design/exports/settingsThe default name is the app name for /, or the app name and route for other pages. The output directory defaults to design/exports/<frame-name>, with the name converted to a lowercase directory name. The command prints the output path when it finishes.
File paths are relative to the app directory, including when using ink -C <app-directory> export. Run exports from the same project sequentially; a concurrent export fails.
design/ is a convention for compositions, fixtures and generated images. Existing app pages can stay in app/.
Supply route parameters
For a route such as app/contacts/[id].tsx, export a concrete path:
ink export /contacts/alexTo supply parameters explicitly, create design/contact.json:
{ "id": "alex" }ink export '/contacts/[id]' --props design/contact.jsonExport a component
Use --entry to export a default-exported component without file routing or app layouts. It requires an Ink project and dependencies, but does not require app/index.tsx. A route and --entry cannot be supplied together.
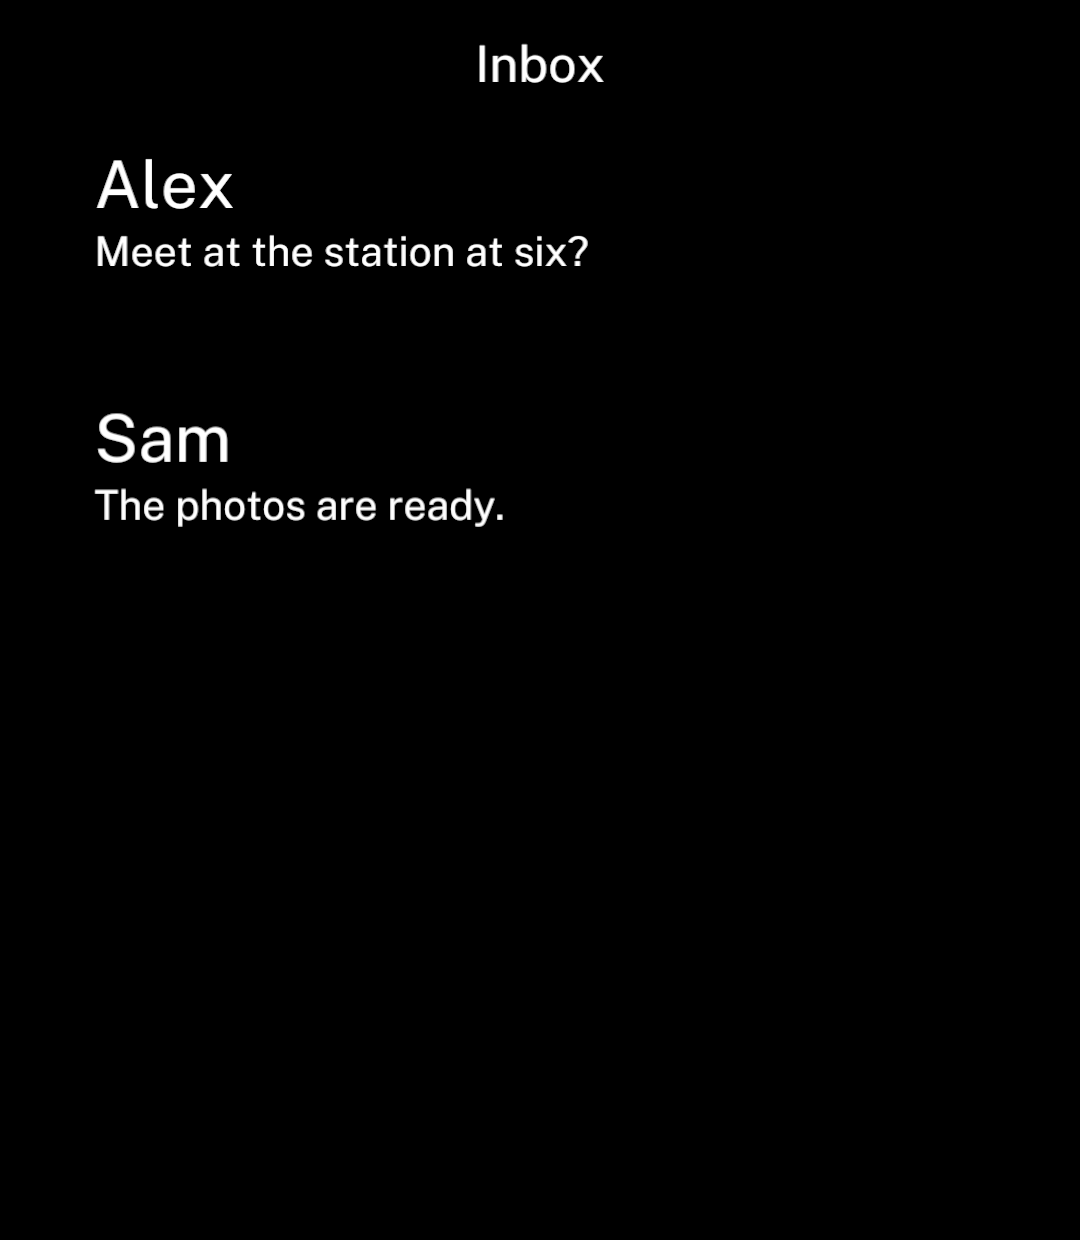
Create design/inbox.tsx. Include a Screen and any context providers the component needs.
import { Row, Screen } from "ink";

export default function Inbox({ messages }: {
  messages: { id: string; title: string; subtitle: string }[];
}) {
  return <Screen title="Inbox">
    {messages.map(message => <Row
      key={message.id}
      title={message.title}
      subtitle={message.subtitle}
    />)}
  </Screen>;
}
Pass component props through design/inbox.json:
{
  "messages": [
    { "id": "alex", "title": "Alex", "subtitle": "Meet at the station at six?" },
    { "id": "sam", "title": "Sam", "subtitle": "The photos are ready." }
  ]
}
ink export --entry design/inbox.tsx --props design/inbox.json \
--name "Inbox" --out design/exports/inboxThe props file must contain a JSON object. Without --name, the frame name is the component filename without its extension.
Seed a store
Use --setup to run a module’s default function before mounting the screen. Ink awaits the function, so it can seed a Store or install fixed API responses.
For a tuning app with a preferences store in lib/preferences.ts, create design/setup.ts:
import { preferences } from "../lib/preferences";

export default async function setup() {
  await preferences.set({
    referenceHz: 442,
    flats: false,
    showCents: true,
    showFrequency: true,
  });
}
From the app directory:
ink export /settings --setup design/setup.ts --out design/exports/settingsEach export uses a fresh in-memory store without changing installed app data. Background workers do not run.
Module imports run before setup. Keep side effects out of preview components’ module-level code. Network requests do not reach real services; use setup to install fixed fetch responses.
Supply native fixtures
Use --fixtures to supply public microphone state. For a screen using usePitchDetector().measurements, create design/live-pitch.json matching its PitchState:
{
  "pitch": {
    "status": "active",
    "frequency": 529.7,
    "note": "C#",
    "octave": 5,
    "cents": 18,
    "confidence": 0.98,
    "error": null
  }
}
ink export / --fixtures design/live-pitch.jsonInk supplies microphone lifecycle responses and granted permission for this fixture. A level fixture similarly accepts LevelState (status, rms, peak, error). Supply one microphone fixture per export.
For app-local native extensions, calls and controllers objects remain available. Calls use module.operation keys; strings are returned unchanged and other values are encoded as JSON. Controllers use their native module name. Explicit raw entries override the public fixture defaults. Store reads and writes work automatically in memory; missing native fixtures fail with the required operation’s name.
Supply images and emoji
Add an images object to the fixtures file to map source URLs to local files. A glyphs object supplies emoji images, keyed by character and requested pixel size:
{
  "images": {
    "https://example.com/portrait.png": "design/portrait.png"
  },
  "glyphs": {
    "🙂": { "46": "design/smile-46.png" }
  }
}
Create the referenced image files before exporting. Emoji images must be square at the requested size. Public Sans and Android’s Noto symbol fallback fonts are bundled; text requiring other system fonts causes the export to fail.
Camera, map and video surfaces require a preview component with explicit images.
Wait for content
Ink waits for the screen to mount, then for at least 500 ms and three consecutive frames with identical pixels. A loading screen can meet those conditions before its data arrives.
Use --ready to wait for a console message from the desired state. Add design/content-ready.tsx to emit a message after mounting:
import { useEffect } from "react";

export function ContentReady() {
  useEffect(() => {
    console.info("INBOX_READY");
  }, []);
  return null;
}
Import ContentReady into design/inbox.tsx and render <ContentReady /> inside the loaded screen. Then export with the matching message:
ink export --entry design/inbox.tsx --props design/inbox.json \
  --ready INBOX_READY
Use --wait to change the minimum settling time after mounting or readiness. Use --timeout to limit the wait for readiness and stable pixels:
ink export / --wait 1500 --timeout 60--wait accepts milliseconds and defaults to 500. --timeout accepts seconds and defaults to 30. Freeze animations and clocks in preview components. Runtime failures or pixels that continue changing until the timeout cause the export to fail.
Generated files
| File | Purpose |
|---|---|
frame.png |
The rendered screen, ready to display in chat or import into a canvas |
tldraw.js |
An import script for an agent with the tldraw plugin; includes the PNG |
manifest.json |
Frame name, dimensions, source inputs and rendering metadata |
Exporting to the same directory replaces its generated files. The manifest includes absolute file paths; export again after moving the project.
Import into tldraw
Drop frame.png into a board, or ask an agent with the tldraw plugin to run tldraw.js through its exec tool. The script creates a 1080 × 1240 frame containing the image on the open board.
Reimporting the same project and frame name updates the existing image. It restores the frame and image dimensions, retains the frame’s position and surrounding drawings, and opens the page containing the frame. Use different frame names for variants.
Edit the TSX or fixture data and export again to change the screen. Board edits do not change the source component.
When an agent imports a screen flow:
- Add named frames and bound arrows to the current page, without an extra title or explanatory text.
- Use native arrow labels and leave space between labels, frame names and other arrows.
- Fit the flow in the viewport. Open a fresh board view to confirm the page and frames are visible.
Export Light Template
From the Ink SDK checkout:
./scripts/ink -C examples/light-template export --entry app/display/icons.tsx \
  --name "Ink · icons" --out design/exports/icons